Remote accommodation is always a challenge often in difficult terrain and
with poor roads.
But lets face it the harsh generally beige heartless "prison blocks" most
frequently used in the earth sciences are appalling!
Are there better alternatives? What follows are some possibilities...
Innovative designers / architects where are you!
Australia Far North Queensland - Construction of Simple Home Using
2X 6m (20') Containers
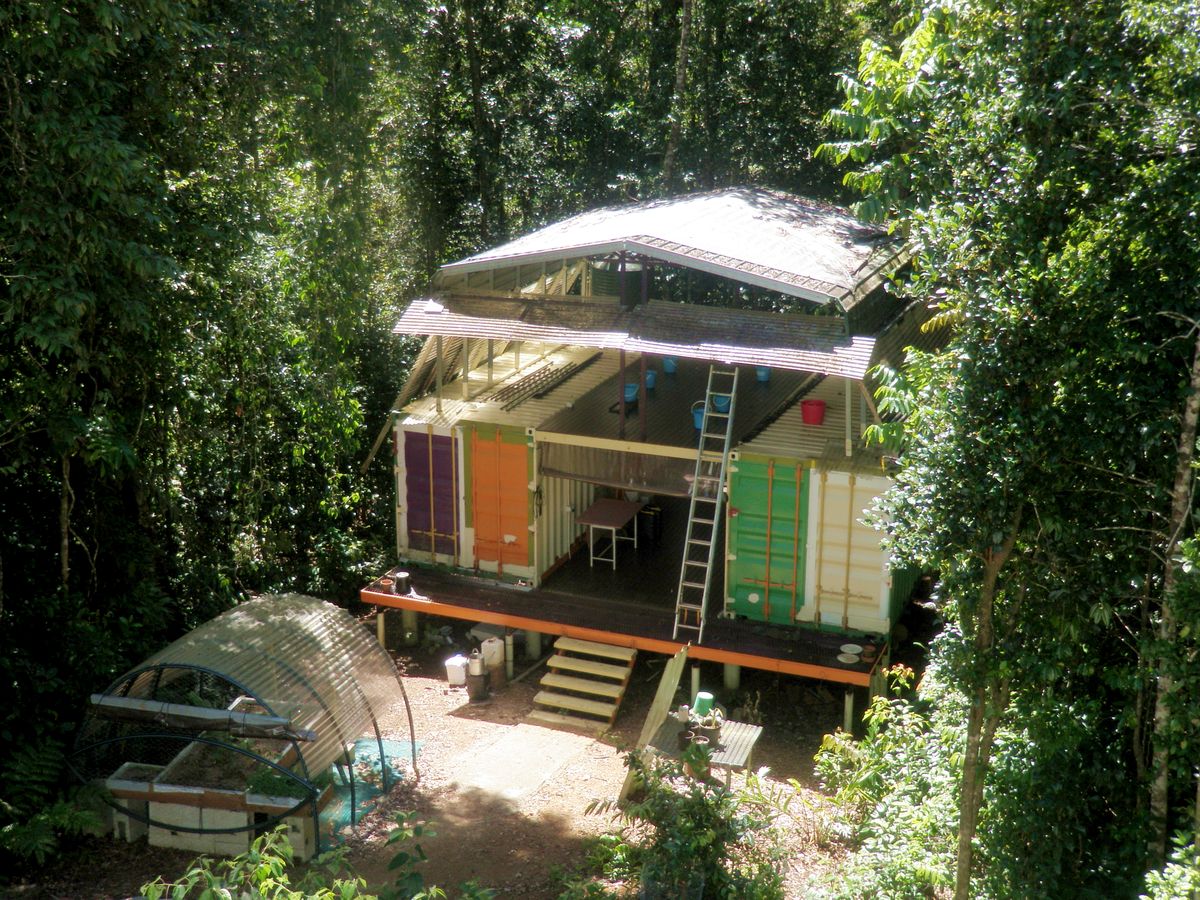
What follows is an example of using two conventional shipping containers
to create 90 square meters of living space in dense rainforest adjoining
World Heritage Rainforest. The facility, on a nature refuge is used for
rainforest research. The terrain is extremely difficult and accessed via a
narrow track made by woodcutters in 1928. The techniques are simple and
require only very basic skills. They produce a dry, durable ,vermin proof,
comfortable, removable facility with a low ecological impact.
our access track to the building site
We cleared the 1928 timber access track by hand using axes and
dragging the material, various distances into the surrounding bush.
All mature trees were avoided, all stumps cut horizontal at ground
level to prevent tyre spearing.
Standard 6m (20') containers were taken down this track one at a
time, on the back of a small tilt truck, the kind used to carry a
single car when they have broken down.
These trucks are widely available and cheap to hire.
At less than two tonnes the container could be maneuvered down a
narrow track between large trees and slid off into a confined area
under control, with ease. In extreme terrain the smaller containers
could even be dragged shorter distances behind a backhoe.
Some internet companies sell wheels you can attach to move by hand
or behind a 4WD.
In less severe terrain a 40' container might be better value, however the
larger container at about 3.5 tonnes would require a much larger truck and
a much better road.
Unloading would also be a problem.
Shipping containers have wooden, not steel floors. It is important to
leave some air space below them in wet environments.
When stacking containers, most of the weight is carried by the steel
frames around the ends of the container.
If you wish to stack containers at right angles additional internal
support for the bottom container may be required. Some containers have
additional support along their side edges but they are hard to find.
We used two 6m (20') containers placed 3m (10') apart.
The site, in Far North Queensland, is situated in dense tropical
rainforest. The area has slippery red lateritic clays and gets about 4m of
rain per year.
The area has many snakes and troublesome white tail rats. The area has
many snakes and troublesome white tail rats.
It was decided to raise the containers onto 1.5m concrete stumps to keep
them out of the wet, to keep them out of the splash and to keep rats and
snakes out.
We did not try to level the ground as it would break the protective root
cover and result in erosion.
PVC plastic pipe with rebar steel was placed into 600mm diameter X
600mm deep holes.
We used a dumpy level and string to get things level.
It is very important to get things level and to have the posts
exactly where you need them - take as much time as needed for this.
The 8 holes and pipes were filled with concrete mixed on the spot
one hole at a time. This took two days.
-->The PVC pipe is expensive
If you are not in a rush and are on level ground so that your posts
are the same length more or less you can make a mould for the concrete
posts from a single length of PVC cut lengthwise in half, riveted down
one side with a piano hinge and held on the other side with two
luggage clamps.
By coating the inside with some sump oil, the mould comes off easily ,
the downside is that you can only do one post per day.
We are now using this successfully for fence posts 10 so far and the
mould shows no signs of wear. <--
What follows is an example of using two conventional shipping containers
to create 90 square meters of living space in dense rainforest adjoining
World Heritage Rainforest.
The facility, on a nature refuge is used for rainforest research.
The containers were lifted onto the posts by a small low profile rubber
tracked crane in about 30min. The concrete posts proved to be very solid
and stable.
We could also have used a backhoe or jacks.
The terrain is extremely difficult and accessed via a narrow track made by
woodcutters in 1928.
The techniques are simple and require only very basic skills.
They produce a dry, durable ,vermin proof, comfortable, removable facility
with a low ecological impact.
We joined the containers with galvanised C-section.
This doubled the floor area
We used a small angle grinder run off a small electrical generator to cut
holes in the sides of the containers for large windows.
Across the front of the two containers we erected 4 smaller diameter
concrete posts and put an galvanised expanded metal mesh walkway. The
walkway served four purposes.
It kept us from tracking mud into the dry living area.
It helped keep snakes and rats out.
It connected the two containers which were separated by 3m.
Finally, in the high rainfall, it permitted the rain to fall
straight through so no run off or splash into the dry container
interior.
In areas or normal rainfall the walkway could be made of less expensive
material.
To the walkway we added a set of prefab concrete steps. this makes it very
easy to check for the ubiquitous rainforest termites.
The containers were also joined together with galvanised C-section as
wooden boards would quickly rot out..
The windows had aluminium frames and used to belong to an old church.
Something you might no have thought of is that once the walls were cut ,
the roof got slightly wobbly so we bolted a 2.5m length of RHS steel
inside across the top of the cut.
We had screens made to fit the windows.
Once we had put wooden decking on the C-section joining the containers, we
repeated the process of C-section and flooring at roof level.
We wanted to have a large sitting out area with which to view the
rainforest
.By elevating this area we got more light, caught more breeze and were
above the normal flight level of the small number of evening mosquitoes.
On the inside wall of each container we cut out a "conventional" door.
The whole top area is used for sitting out, drying clothes, projects.
We bought three small and very cheap portable carports to cover the roof
area.
First, the rainforest leaves are very hard on paint so the plastic
roof area deflects this.
Second, we have attached 2 X 6m lengths of 90mm PVC plastic storm
water pipe to collect drinking water.
Third, the plastic roofing reduces the noise of the intense tropical
downpours.
Fourth, the roofing provides shade and keeps the container much
cooler - shading of containers is essential if you plan to place them
in an exposed location
We used rain off the plastic carport roofs to fill a plastic water tank
We screened the large container doors with aluminium mesh to give
ventilation but discourage giant white-tail rats.
How to make a door ...
Basically we welded a rectangular frame out of RHS and attached it
where we wanted a door.
Next we used an angle grinder to cut out the part of the wall inside
the frame.
To this cut out we attached a second smaller RHS frame and welded
the cut out to it.
Between the two frames we attached a couple of stainless steel
hinges and a clasp for a padlock.
This will become our main (mostly dry) entrance.The smallest and cheapest
angle grinder worked best for cutting doors / windows in the container.
We used RHS to make secure, lockable entrance doors from the decking area.
We prefabricated the external and internal RHS frames - take care to line
up the containers ribs to get flat areas and note the rib spacing differs
from container to container , marked it up then cut the doorway.
We then laid the cut-outs on the internal frame, marked them and cut to
fit - this was harder than expected because the rib spacing pattern
affects both where you place a door and the ultimate door size!
Due to the extreme rainfall we had to put some local gravel on the track.
There are frequent drainages across the track to drain water away and
reduce water velocity, the result - no erosion and all weather access.
We always travel at low speed in low range with the Landrover while under
the canopy, a gentle footprint keeps the track in top shape.
Prior to the gravel we had a trip in and slid off the track all we needed
was about 2 hours of dry weather and we would have the grip to get out -
four days later, eating wheatabix and peanut paste , the rain finally gave
us a break and wee decided gravel was a good idea.
Even in years of exceptionally high rainfall, the containers stay dry and
free of insects or vermin.
The idea is to build something simple and liveable.
We are very satisfied with the shipping containers.
Then on March 20, 2006 came Cyclone Larry, Category 5 with local wind
gusts to 283kmh!
The cheap plastic carport roof was damaged but the shipping containers
suffered no damage at all despite the huge winds and falling branches.
Many large branches fell on the roof but inside remained watertight.
We replaced the damaged roof with a steel shadeshed.
It was pretty easy to erect and the pieces were light enough to lift by
hand. Notice how most of the background leaves have been blown away!
The shadeshed is attached to the shipping containers by turnbuckles and
chains to each corner, visible along the line of the white tarp shown
below...
Our new guttering to the 1200Lwater tank was much better and we decided to
draw water from just one side of the roof.
By attaching one side of the water tank support directly to the shipping
container we used only half as much steel.
Later we added a second (3000L) water tank to collect water off the second
side of the shadshed.
The second tank is on the ground and we use a submercible pump to pump it
into the upper tank if we want pressurised water.
Our post Cyclone Larry Rainforest Retreat ... but our structure was to be
severely tested yet again!
On February 3, 2011 Severe Tropical Cyclone Yasi Category 5 passed over
the stucture.
In the severe winds, the shadeshed shifted and twisted slightly but the
chains attaching it to the roof held.
We used a small car jack to re-position the shadeshed,
It was simply a matter of loosening the chains and raising one corner a
few centimetres.
The twisted shadeshed, under tension simply popped back into its original
shape and position.
Two Category 5 cyclones in five years is enough - no more please!
The large cargo doors of the containers have a simple wooden frame erected
across them to which we metal flyscreen attach fly screen.
In the rainforest a dry area and maximum ventilation are the key to
comfort.
In high rainfall areas it is critical to get the containers as high off
the ground as possible in order to avoid splashback, things the creep
slither, crawl or bite and in order to keep the wooden floors well
ventilated and easily accessible.
Most recently...we have now replaced the moss covered vinyl tarps on the
sides with polycarbonate sheets in order to block spray from the rain and
let light in to assist with drying out.
Our rainforest research facility cost us about $16,000 AUS(2006) all up
including two containers, trucking the containers some 500km, screening in
the cargo doors, steel, cement, sand and gravel, nuts, bolts,three
carports, C-section, screens, timber, decking oil and painting - the lot.
We have 30sqm of totally dry sleeping area, 15sqm of mostly dry cooking
area and 45sqm of covered sitting out area a total of 90sqm undercover.
All our building materials are removeable, for re-purposing (best) or
re-cycling (next best).
While it may initially seem counter intuitive - in this situation the use
of wood is not as green.
Wood breaks down here regardless of how you try to coat it.
Recycled wood would be of poor quality for re-purposing or recycling.
California - container design ideas
Kathy Tafel, KTainer,- California - 4 Shipping Container Home (mirror - no
longer on the web)
I like the 24' length. It divides into spaces really easily - in half,
thirds, fourths, sixths, and twelfths. A 20' container naturally divides
in half, fourths, fifths, and tenths. I really like harmonic thirds.
Having the high cube means 9' 6" ceilings. Many homes only have 8'
ceilings in places.
Putting the four together, half the space is public, half private. The
public half are two containers next to each other for living, kitchen,
and dining. The private half are stacked on top of each other, for
bedroom, half-bath, study and guest sleeping. The two sections are
joined together with an 8 foot overlap, or, in thirds.
The long side of the house is then 40' long, and 24' wide, a nice 3/5
ratio. The long side of the house will face north-south, the short side
east-west, for maximum passive solar optimization. Also the tall side of
the house shades the living quarters for the better part of the morning.
Why not clad / insulate your container with logs?
Things ot consider about shipping containers?
Shipping containers are fast becoming a trendy and highly
adaptable frame work for use in home building.
Their strength is at each end - so you can stack them on top of
each other but stacking at right angles would require additional
steel support
When deciding between used or new shipping containers this is a
personal choice...
if the home structure is visible to neighbours and may be
considered an eye sore consider new or
if the containers are being painted or left in their original
condition to add character consider used
the price difference between new and used is sometimes not as
much as you think
some aluminium containers are coming onto the market - they may
suit corrosive environments
former -refrigerated containers are often very small inside
The most important consideration when selecting the fit for
purpose shipping container to form part of a home structure its
paramount you ensure the structural integrity of the container(s)
being utilised.
Make sure the shipping container being used has minimal to no roof
indentations that will allow water to pool. Some roof dents can be
taken out with a cheap Acroprop.
Check the under structure is sound particularly the doors,
Check the timber floor has not been affected by white ants, or
delamination.
Avoid repaired containers with patches or welds - these places
will rust first
The use of high cube shipping containers, in preference to
standard height Containers is also highly advisable, as they allow
an additional 300mm of clearance, and make the space look and feel
larger, and more homely.
Once you have selected the appropriate container, you need
ensuring you have clear access for the truck delivering the
container, and a hard stand well drained, level pad for the
containers to be placed.
Shipping containers can get very hot in the Australian sun -
consider some way of shading them
Keep in mind if you insulate it maybe better to do it on the
outside rather than reduce the space inside
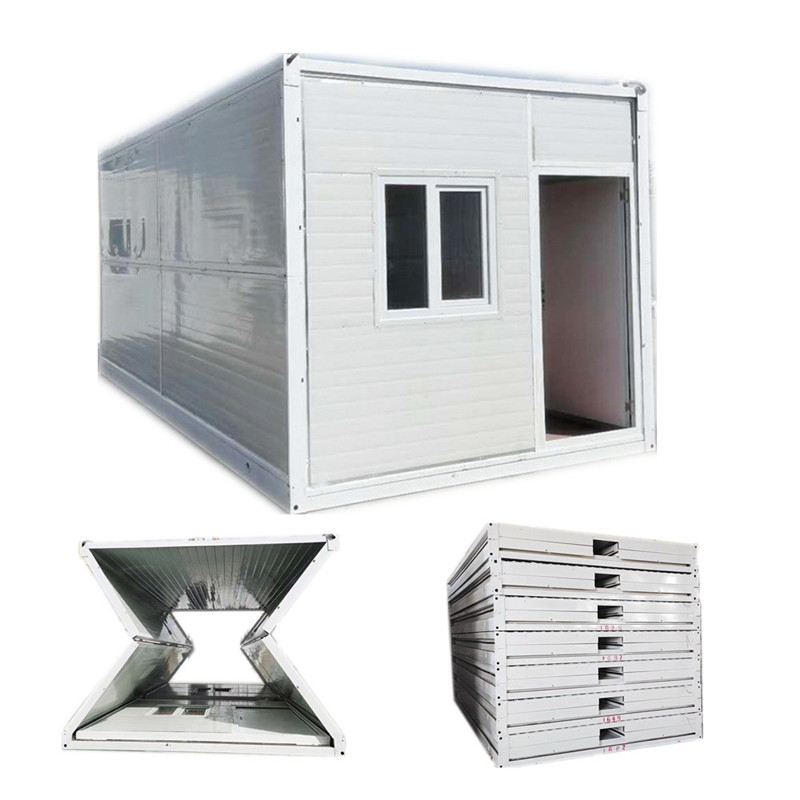
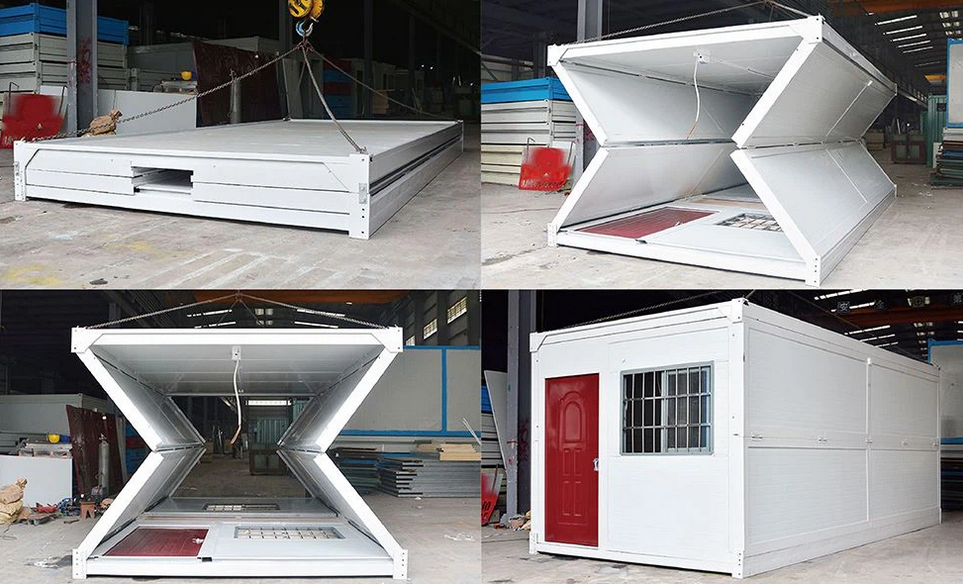
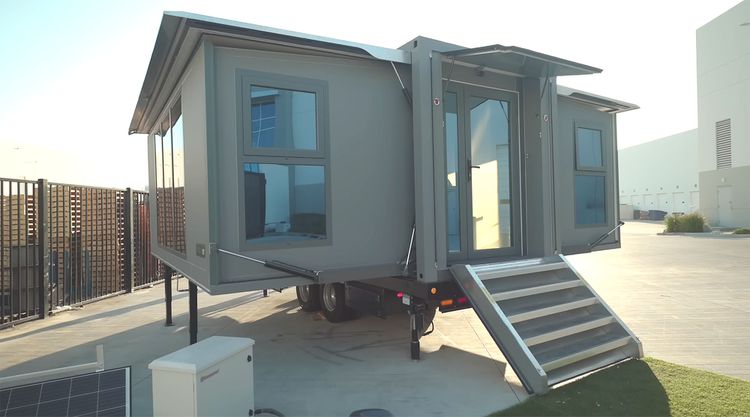
Foldable Accommodation
Folding accommodation is easy to transport and install, has the
characteristics of environmental protection, sustainability,
affordability.and has the potential.
If good design is used, there is potential to not only look nice but to
be welcoming and cheerful.
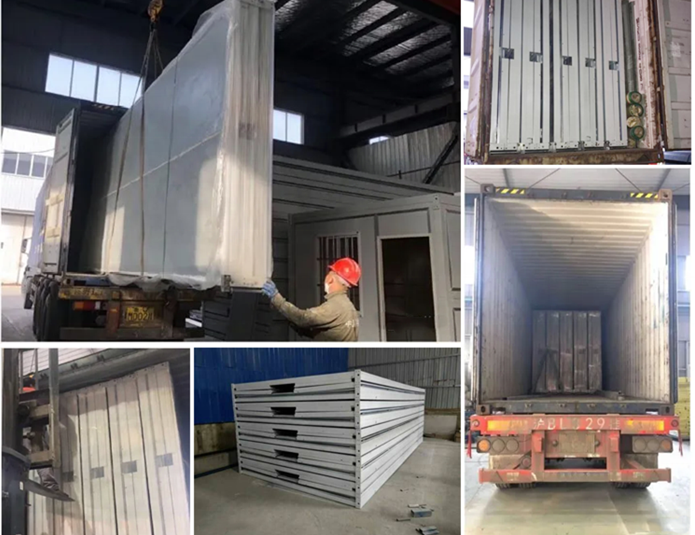
Compared to assembled pre-fabricated accommodation currently in use , in
transport there are no over height or over length loads to content with.
A semi-truck could carry about 20 times the volume of accommodation in a
single load using these flatpack designs.
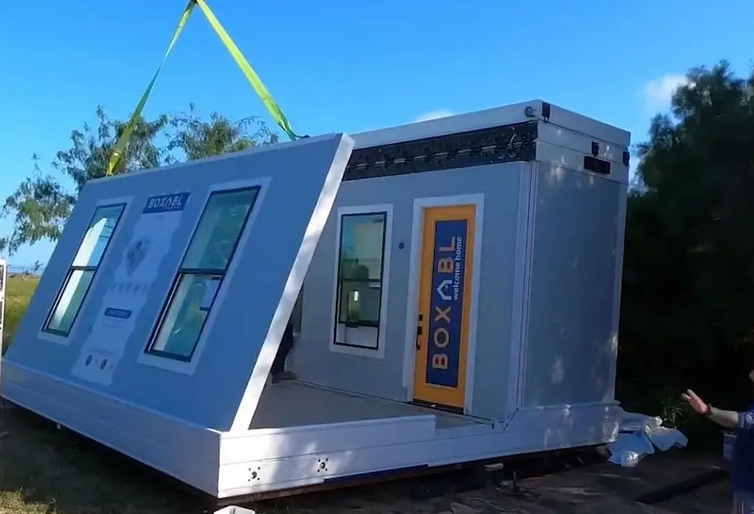
Employing innovative designs foldable accommodation is constructed from
modular components.The folding mechanism allows for substantial savings
in space during transportation and storage, making them an efficient
choice for various geographical areas.
However the folding mechanisms of various types do present a challenge
of making the accommodation truly weather tight.
Similarly some folding mechanisms alow you to unfold the accommodation -
but can the accommodation be re-folded and transported elsewhere should
it be desired?
The materials used in construction vary from wood, metal, to high-tech
composites.
As they are pre-engineered in factories, these structure are designed
for quick assembly and are often customisable. With computer design the
substantial waste associated with conventional building practices is
minimised.
Advantages:
Factory prefabrication in all weather, non-specialist on-site
installation, minimisation of waste
The concept of constructing buildings and other structures using
prefabricated materials and building sections draws inspiration from
the mass production and mass consumption models of the modern
industrial economy.
Stable structure and potentially stylish appearance
The structure of folding accommodation can be stable, cyclone
resistant, windproof, waterproof, moisture-proof, and stylish.
Convenient transportation and fast installation
Due to the small volume of the folding container accommodation ( as
little as height of 45cm!), after folding they are easy to
transport.
One vehicle can stack about 20 modules. The installation is also
very fast, pulling and pushing, a matter of hours or days rather
than months.
Folding Accomodation if properly designed can be recycled
Cost Effectiveness
Can be built, transported and erected cheaply and quickly with
minimal labour and equipment. Dramatically reduced construction time
from months to weeks.
Disadvantages of Folding Accommodation
Largely imported primarily from China
May not meet Australian building codes for example a 2.4m ceiling
height - this can be overcome by mounting the accommodation on a
trailer and classifying it as a "caravan"
Component replacement, like for like, may be a challenge
Currently relatively short life span of about 10 years
Uses light weight steel structural materials, which are prone to
aging, corrosion, and other problems due to long-term natural wind,
sun, and human damage.
This could be rectified easily with improved specifications but
currently foldables appear to be designed for a "lowest price"
market.
Re-aligning to "mid-price" products would result in greater
longevity and increased market penetration.
Poor sound / heat insulation due to effect of folding
Folding accommodation uses insulated walls as thin as 25mm so
currently not really suited to the extremes of Australian weather
Limited Design Options
Foldables may have more rigid design constraints than traditional
accommodation as the components must be flatpacked with dimensions
limited to standard semi-truck sizes , making it challenging to
achieve specific architectural styles.
Difficulties with Financing and Insurance
Obtaining financing for foldable accommodation can sometimes be more
complex than for traditional accommodation. Will the foldable last
the length of the mortgage?
Australian insurance companies are extremely slow in adopting this
innovative technology - not surprisingly this is not true
for most of the other world's developed economies
Perception and Resale Value
There may be a stigma attached to folding accommodation, which can
impact resale value and marketability.
Difficulties meeting local council / state Land Requirements
A major stumbling block - Foldable accommodation may not meet local
building approval requirements.
This varies great throughout Australia and there appears to be no
uniform standards.
Limited Fabrication / Import Entry Facilities
Currently facilities are largely urban and limited to and around
capital cities.
Regionalising some facilities would encourage a bigger market and
local employment growth.
Conclusion
Prefab folding accommodation represent a significant advancement in
modern architecture, potentially combining cost-effectiveness,
sustainability, and design versatility. As we navigate the challenges of
urbanisation and environmental concerns, these structures offer a viable
solution that caters to the needs of contemporary living. By
understanding the benefits and potential drawbacks of prefabricated
folding houses, we can make informed decisions.
What Shipping Container Should I Buy?
External Links (courtesy containertraders.com.au): Types of Containers Available Dimensions / Capacities Container Grades - What to look for... Current Price ranges
Shipping Containers an unrivalled and highly versatile multipurpose sub structure with uncapped applications.
Over the last 10 years there has been more Shipping Containers For Sale than ever before.
With an constant supply of Used Shipping Containers, and new Shipping Containers available in almost every country in the world, Shipping Containers are fast becoming a trendy and highly adaptable frame work for use in home building.
When deciding between Used Shipping Containers or New Shipping Containers this is a personal choice, and highly dependent upon the way the exterior and interior will be dressed, if the home structure is visible to neighbours and may be considered an eye sore, and if the containers are being painted or left in their original condition to add character.
The most important consideration when selecting the fit for purpose Shipping Container to form part of a home structure its paramount you ensure the structural integrity of the container(s) being utilised.
Make sure the Shipping Container being used has minimal to no roof indentations that will allow water to pool.
Check the under structure is sound, and the timber floor has not been affected by white ants, or delamination.
The use of High Cube Shipping Containers, in preference to standard height Containers is also highly advisable, as they allow an additional 300mm of clearance, and make the space look and feel larger, and more homely.
Once you have selected the appropriate container, you need ensuring you have clear access for the truck delivering the container, and a hard stand well drained, level pad for the containers to be placed.
Buy or Hire from Container Traders Container Traders Pty Ltd sell and hire Shipping Containers Australia wide.
Being a large supplier of Containers, Container Traders have noticed a large increase in the volume of customers buying Shipping Containers for house applications.
Container Traders are highly experienced, and happy to assist to discuss requirements with people looking to upcycle, and repurpose Shipping Containers for a home application.
Give the team a call on 1300 89 89 70 to discuss the best fit for your requirements, and the most appropriate truck for delivery to your location.
Container Traders can also assist with providing Container modifications.